Introduction to Chords
Playing multiple notes at once
What is a Chord?
A chord is three or more notes played simultaneously. While melodies are sequences of single notes, chords provide the harmonic backdrop — the rich, full sound that accompanies singing or other instruments.
Chords are the backbone of almost every song. Learn a handful of chords and you can play thousands of songs.
Chord Diagrams Explained
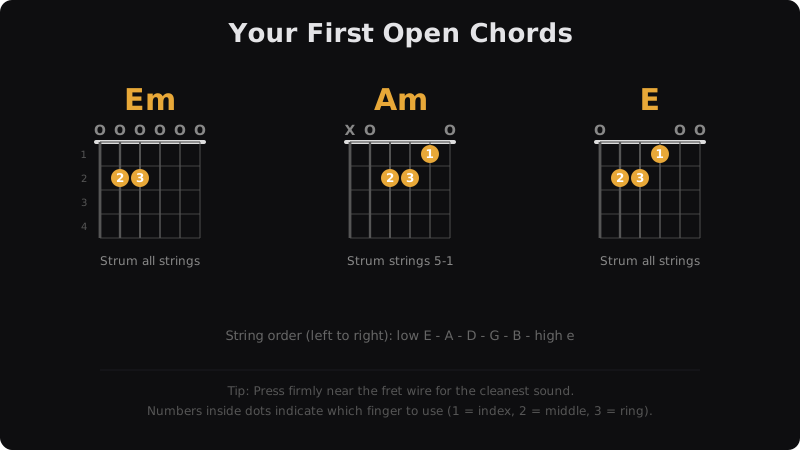
Chord diagrams (chord boxes) are visual maps showing you where to put your fingers:
- The vertical lines represent the 6 strings (left = low E, right = high E)
- The horizontal lines represent frets
- Black dots show where to press
- Numbers inside or below dots show which finger to use (1=index, 2=middle, 3=ring, 4=pinky)
- O above a string means play it open
- X above a string means don't play it (mute it or skip it)
Throughout this course, we'll show both the chord diagram and the tab for every chord.
Your First Chord: Em (E minor)
Em is often the very first chord taught because it only requires two fingers:
Place your middle finger on fret 2 of string 5 (A string)
Place your ring finger on fret 2 of string 4 (D string)
Strum all 6 strings
That's it. All six strings ring out, four of them open. It should sound dark, moody, and full. If any string sounds muted or buzzy, check that your fingers are curved and not touching adjacent strings.
Your Second Chord: Am (A minor)
Am adds one more finger:
Place your index finger on fret 1 of string 2 (B string)
Place your middle finger on fret 2 of string 4 (D string)
Place your ring finger on fret 2 of string 3 (G string)
Strum from string 5 (A) down — don't hit string 6
Am is another minor chord with a melancholy feel. Check every string rings clearly by picking each one individually.
Switching Between Em and Am
Now the real challenge: changing from one chord to another smoothly. The goal is to make the switch without a big pause in the music.
Tips for smooth changes:
- Look for common fingers: when going from Em to Am, your middle finger stays on fret 2 — it just moves from string 5 to string 4. That's your anchor.
- Move all fingers together: don't place them one at a time. Lift, rearrange in the air, land together.
- Practise the motion slowly without strumming. Just switch shapes back and forth until the muscle memory builds.
Tab Examples
Em chord
e--0-- B--0-- G--0-- D--2-- A--2-- E--0--
Am chord
e--0-- B--1-- G--2-- D--2-- A--0-- E-----
Em to Am switching practice
e--0--0--0--0----0--0--0--0-- B--0--0--0--0----1--1--1--1-- G--0--0--0--0----2--2--2--2-- D--2--2--2--2----2--2--2--2-- A--2--2--2--2----0--0--0--0-- E--0--0--0--0----------------
Chord Diagrams
Tips
- Check every string individually after forming a chord — each should ring clean
- Keep your thumb behind the neck, roughly opposite your middle finger
- Focus on accuracy first, speed later
- Em and Am are used in thousands of songs — these two chords alone unlock many tunes
Practice Exercises
- Form Em and check each string individually — all six should ring clean
- Form Am and check strings 5 to 1 — make sure string 6 is muted or avoided
- Switch between Em and Am every 4 beats with a metronome at 60 BPM
- Once comfortable, try every 2 beats, then every beat