Basic Fretting Technique
Clean sound from every fret
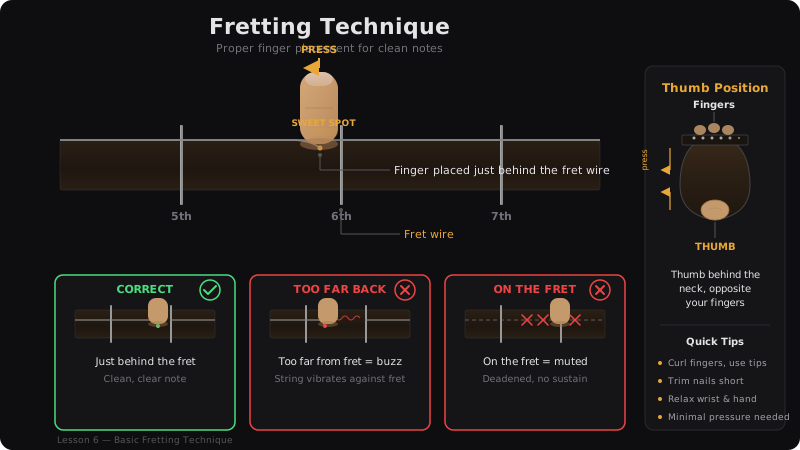
The Fret-Hand Fundamentals
Good fretting technique comes down to four things: placement (where your finger sits), pressure (how hard you press), angle (how your finger approaches the string), and independence (each finger doing its job without the others interfering).
Getting these right now will save you months of frustration later. Every advanced technique — bends, hammer-ons, barre chords — depends on these basics.
Finger Placement
Your finger should sit just behind the fret wire — not on top of it, not in the middle of the gap. "Just behind" means between the fret wire and the next fret wire toward the headstock, but close to the wire on the body side.
Pressing on top of the fret wire creates a dead/muted sound. Pressing too far from the wire requires much more pressure and often causes buzzing.
Pressure
You need less pressure than you think. Beginners often death-grip the neck, which causes fatigue, pain, and slower finger movement.
Try this test: fret a note with almost no pressure. Pick the string — it will buzz or be muted. Now gradually increase pressure until the note rings clean. Stop there. That's the minimum pressure you need. Anything more is wasted energy.
Over time your fingers will build calluses on the tips, and even that minimum pressure will feel effortless.
Finger Curvature
Curve your fingers so you're pressing with the very tip. If your fingers are flat, you'll mute adjacent strings. Think of your fingers as little hammers — each one drops straight down onto its target string.
Your thumb should sit on the back of the neck, roughly opposite your middle finger. It provides counter-pressure. Don't let your thumb creep over the top of the neck (unless you're intentionally wrapping it for certain chords later).
One-Finger-Per-Fret
A fundamental rule for your left hand: assign one finger per fret. In the first position (frets 1-4):
- Index finger = fret 1
- Middle finger = fret 2
- Ring finger = fret 3
- Pinky = fret 4
This "one-finger-per-fret" approach is the foundation of efficient playing. Your fingers stay close to the fretboard, ready to act, rather than flying off and having to return.
Tab Examples
One-finger-per-fret exercise (string 1)
e--1--2--3--4--4--3--2--1-- B--------------------------- G--------------------------- D--------------------------- A--------------------------- E---------------------------
Same exercise across all strings
e--1--2--3--4-------------- B--1--2--3--4-------------- G--1--2--3--4-------------- D--1--2--3--4-------------- A--1--2--3--4-------------- E--1--2--3--4--------------
Tips
- Press lighter than you think — only enough for a clean sound
- Keep unused fingers hovering close to the strings, not flying away
- Your fretting thumb should be behind the neck, not over the top
- Calluses take 2-3 weeks to develop — short, regular practice sessions help more than marathon sessions
Practice Exercises
- Do the one-finger-per-fret exercise on every string (up and down)
- Practice the pressure test: find the minimum pressure for a clean note on each string
- Play frets 1-2-3-4 on string 6, then move to string 5, all the way to string 1
- Reverse: start on string 1, play 4-3-2-1, move to string 2, and so on